Showing posts with label Observation. Show all posts

Tuesday, 26 October 2021

Drawing By Dissociation

One of the biggest struggles in drawing or painting is when parts of our brain tell us what it "knows" something looks like, which prevents us from actually "seeing" what is in front of us. This results in drawing a more icon-like or familiar version of our subject instead of what is before us. 


The Eyes Have It 

An example that showcases this problem, one that I constantly come across, is in regards to drawing eyes. There is a part of our brain that likes to simplify things into icon-like images. It tells us that the eye is a pointy ended oval having a circle within a circle in the middle. Another part then tells us it is aware of certain physical details like eyelashes, which need to be added. The result is typically something like you see on the right.
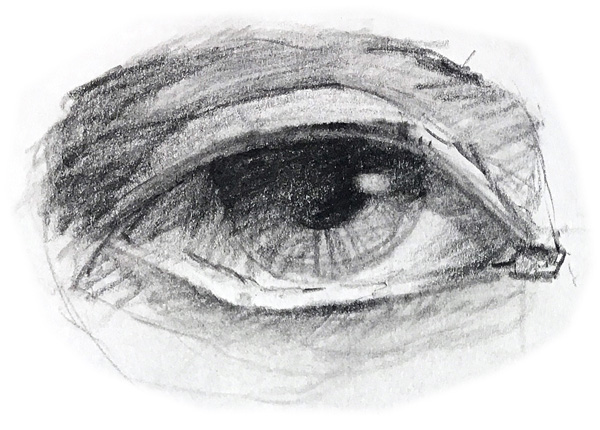

Alternatively, we want to access those parts of our brain that are more observationally attuned to understanding what we are actually looking at. When this is applied we end up with an eye that is more accurate and tends to look more realistic, as seen here.


So how is this accomplished?


Dissociation From Our Subject

At first, this may sound counterproductive but to get around the problems discussed above of icons and information, we need to help our brains switch gears.

This is done through dissociation with our subject. It is the conscious and purposeful practice of looking at your subject in terms of measurements, comparisons, and angles. Keep from using the more familiar names or terms but look to the structures, shapes and relationships that are in front of you.


Talk to most portrait artists and they will tell you they are very conscious about NOT drawing or painting an eye, a nose or a mouth. They are more concentrated on the shapes, spaces, measures and angles that create their subject's unique features. Many say if they think of an "eye" or a "nose" they can easily create a more generic, familiar eye than the one they are looking at.


A Practical Example

In this case, what we want to do is dissociate with what we know about water bottles. Our brain has a simplified icon and will tell you all that it "knows" about bottles of this sort. At this point, we switch gears and purpose not to think of it as a water bottle but an object with no familiar descriptors. Rather we focus on its height-to-width relationship, what are the angles that point to its top? How wide is the green shape on top compared to the width of the object? Where is the halfway point? And so on.


Building Mental Muscles
So why this game? Once our brain becomes familiar with something, it doesn't need to remember the myriad of water bottles available on the market, but it just simplifies one and creates an icon for it. Our brain has many different functions and we need to learn how to access and flex the right mental muscles when it comes to observation.


Initially, We Always Observe
However, when we first observe a new subject or even view a familiar subject from a new aspect, we switch over to the observational functions of our brain.

To illustrate this I have included the same image of the bottle but rotated it 180 degrees. It is now unfamiliar, your brain doesn't usually see bottles in this orientation. Note your experience at seeing the rotated bottle. It is now more about shape and relationship than familiar icon simplification. You have dissociated from the familiar and are observing with more accuracy.


The more we choose to dissociate from our subjects in familiar terms and general identifiers, the better our drawings and paintings will be.

Monday, 4 October 2021

Breaking The Lines

Variety Is the Spice of "Lines"
From a young age, we have an unconscious tendency, to contain every shape within a constant, even, solid line. Putting in all the details for every object we draw. The effect can be like a bad colouring book page. One that has too much information and is flat nor visually interesting. Alternatively, having a variety of line weights in a drawing, ranging from thin to thick, helps create visual interest with a sense of light, shadow and depth. Thinner lines are generally used for elements further away in the background, with heavier lines applied to objects in the foreground. Adding to this, we can "break" some of these lines into broken, even unconnected marks to create more visual interest for our viewers. With these things in mind, compare the two drawings above in terms of which is more visually appealing.

Knowing Which Weight of Line to Use
A common question is: "How do you know when to vary the line weights?" One way is to think of your lines in terms of light and shadow. For instance, in the house on the right, the light is coming from the left-hand side. Therefore, the chimney has a thicker line on its right side, the shadow side. While its left side has just a hint of a broken line, where the light is hitting it. The key is to keep this treatment consistent throughout the drawing.  
 

Varying Similar Elements
When drawing repeating objects in a subject, vary the treatment of each one. The windows in the left drawing are basically the same. Not of much interest, visually boring. For the windows in the right-hand drawing, each pane of glass is rendered differently. Every detail doesn't need to be put in, because the reality is we cannot see every detail. This type of treatment allows the viewer's mind to add those details, therefore, engaging them more with your drawing. A simple readjustment in our thinking and execution can make a simple drawing look like an illustration.  

Sidenote About Ability
Did you notice that the left-hand drawing of the house in the above sample was done using what could be referred to as a“child-like” style? The house on the right has EXACTLY the same underdrawing, using the same shapes and forms, with NO DIFFERENCE IN DRAWING ABILITY. It is only the treatment of the lines and edges that have created a distinctive look.  

Exercise Sheet
Click on the exercise sheet below, copy it, print it and using a black marker or pen (no pencil) apply the concepts discussed here to create a new drawing on the greyed out image.

Small adjustments in our thinking during the planning aspects for the linework in our drawings can make a big difference in the final result.

Wednesday, 29 September 2021

How Our Eyes See: Part 2

If you have not read "How Our Eyes See: Part 1" please click HERE first.

Now that we have some practical insight into how our eyes function, the next step is to incorporate that understanding into our work using what we have learned about Integrated Observation. 

The Focal Point
The Focal Point of a drawing or painting is the targeted area where we want to direct our viewer to go. It is usually the main subject or area of the artwork. Selecting this point is based on how our central acuity works, that small 5° area of our vision where everything comes into focus. Understanding Integrated Observation, helps us to select and plan for what the Focal Point of our drawing or painting will be. Here the values will have more contrast, the colours be more intense, and the edges the sharpest. As our subject moves into our peripheral vision, those areas are rendered with less value contrast, less intense colours, softer edges, and less detail. Resulting in a picture that has an overall visual harmony where everything works together as an "integrated" whole in the same way that our eyes see.

Segmented Observation  
Segmented Observation is what I refer to as the natural tendency to quickly shift focus around our environment, in a partitioned way. We are not even aware of it because it is so natural. It is like when we walk down a street. Our eyes are continually moving, shifting focus from people to cars to buildings, then back again. We are looking at "segments" of the street scene using our central vision, causing us to think that everything is in focus. This spills over into how we view any subject when drawing or painting, whether from life or a photographic reference. Unfortunately, we see it with Segmented Observation.

Segmented Observation Into Integrated Observation
Look below at the coins from Part 1. Everything appears to be in focus. Look again, now be aware of how your eyes naturally move from one coin to the next refocusing in order to create that illusion. This is Segmented Observation.

Now, concentrate on the coin with the hole. It is a different visual experience. Only that coin is clear and distinct while the rest become more indistinct. This is Integrated Observation. This area, that you are concentrating on, is the Focal Point.

Creating Integrated Observation From Segmented Observation  
Below I have simulated Integrated Observation to the same coins by applying the concepts discussed here and in Part 1. Note how this treatment directs you to one specific coin, the one with the hole. I achieved this by keeping sharp edges and stronger value contrasts at that spot. Moving out from the Focal Point, we see the edges getting softer, the colours looking slightly less intense, and the value contrasts becoming less with the remaining coins. This is the type of manipulation we want to consciously, create in our drawings or paintings.

Image by Uwe Baumann from Pixabay

Whether consciously or unconsciously, people respond to drawings and paintings that portray their subjects in the same way that our eyes see them. Bringing this understanding into your drawings and paintings will help move your work to the next level.

Continue to hone and develop this important foundational skill in both your daily observations and your drawings and paintings. 

Monday, 27 September 2021

How Our Eyes See: Part 1

Many times I tell my students "It is not about how to draw, but how to understand what you see." It is critical to know how our brain processes and evaluates everything we observe. The brain has a lot of power, especially in the area of sight. When we are born, our eyes naturally see everything upside down. Over time our brain is able to flip that so we can process things right side up. Yet your physical eyes are still seeing upside down, even as you read this!

How the Camera Sees
Contrary to popular belief, eyes do not function in the same way as the camera lens. They are much, much more complex than that. The camera lens sees everything in focus from left to right and top to bottom. The photographic images we see in magazines, books, movies, videos, television, computers, digital phones, and tablets have been taken through a lens of some manufacture. Cameras do create other distortions, but we will save those for another time. Photography has become the ruler that most people use to measure realism. 

How Our Eyes See
Our eyes are quite different from a camera lens. They have both central and peripheral vision or acuity. Our central vision observes what we are looking at directly with clarity, focus, and contrast within a small area of about 5°. Moving out from our central vision, our peripheral acuity covers the remaining 175° or so, seeing larger shapes, movement, and general colours but observes no detail or strong contrasts. 

Integrated Observation

What I term "Integrated Observation" is, in essence, seeing the forest AND the trees in their proper visual relationship in terms of how our eyes see. It is being conscious of how our central, and peripheral vision works together to understand the subject in front of us. Seeing the overall picture as it were. The task at hand is then to translate that understanding to create a visually comprehensive drawing or painting.


A Practical Exercise
Look at the photo of the coins below. Due to the camera lens, this whole image is in focus, from left to right and top to bottom. Now concentrate on the coin with the hole in it. Keep your eyes fixed on that point and observe what happens to the rest of the coins. Even though they are close in proximity, you cannot read the text or clearly make out the images on the surrounding coins. Shift your focus to another coin, now this one becomes clear and distinct but the clarity you had on the first coin is lost. This is how our eyes see. This is Integrated Observation. 

Image by Uwe Baumann from Pixabay
Seeing The World Through Integrated Observation
Now, observe this effect in the third dimension. Place eight or ten coins on a table, and walk through the above exercise again. Repeat this with everything around you, everywhere you go. Remember to stay focused on a single point of whatever it is you are observing. Look at a bookshelf, a street scene, a landscape, the dishes in the sink, people in a group, etc. Take note of your experiences and think about how this could influence your work. 

In Part 2, we will expand on what we have learned here and look at how to apply this practically to our drawings and paintings.   


Monday, 20 September 2021

Building a Visual Memory File: Height and Width

If you have not done the lessons in “It's as Easy as A, B, and C" click HERE or "A, B and C: Good Things Come In Threes" click HERE and work through those first before proceeding with this exercise or to give them a quick review.

In "A, B and C: Good Things Come In Threes" we practiced how you can "force" your mind to build a Visual Memory File, resulting in a more accurate drawing of your subject. Here, you will begin to learn how to consciously, familiarize yourself with a subject's visual information. This begins the process of creating a series of checklists. Each list gets added to your Visual Memory File.  These lists become your guides throughout the various stages of a drawing or painting.

Starting a New Visual Memory File
Staying with the bottle from the previous exercise, we will start to break down the type of information we need. First, look for a measure within the subject. One that can be used as a common ruler against the overall subject. In the left bottle below, the height is established as 3 1/3 times its width. The first piece of information for your Visual Memory File. This translates into a proportion, a long thin rectangular shape (middle bottle). The next piece, for your Visual Memory File. That rectangle can be split in half and then into quarters (right bottle). The third piece of data for your Visual Memory File.  


A good start. However, the reason we build a Visual Memory File is to become as intimately familiar with our subject as we can. Just as in any research endeavour, the more informative data you collect, the better your final assessment will be in the end.

With this in mind, the green bottle cap will be used as the measure here, showing the bottle to be 2 1/4 caps wide by 7 1/3 caps in height. This breakdown gives us new information about the placement of different elements within the bottle. For instance, the short neck of the bottle is one cap measure from the top. The curve around the middle of the bottle sits about four cap lengths down. The bottom section of the bottle lies at six cap lengths down, etc. More data for your Visual Memory File.

Four pieces of information about this bottle have been added to your Visual Memory File. They are now part of your conscious memory, not only giving you cues to build your drawing with accuracy but helping you catch mistakes earlier in the process. 

Proportion snd Recognition 
The recognition of a person or object has more to do with the correct proportions of their larger shapes than anything else. Our mind processes large shapes first when it comes to identification. Details come later in the process. If the width to height proportions are correct, you are more than halfway there towards creating recognition in your drawing. 

The recognition of your subject
has more to do with getting its
correct proportions than its detail.

For example, using the information gathered above regarding the bottle, we know it to be a long thin rectangle in its overall shape. Once we begin blocking out the bottle, we quickly become aware of any drawing problems due to inaccurate proportions, as seen below.

A Strong Begining
Establishing height and width are strong, the first steps for breaking down and understanding any subject. There are a number of other visual cues that can be applied. Different ways of gathering more information for your Visual Memory File. We will be looking at these in the near future.

In the meantime review this method with different objects and scenes. Practice working it in your mind as well as down on paper. See if you can develop other ways of assessing your subject and post them in the comments below.

Knowledge is power. Understanding how to collect and apply that knowledge is the key, especially when it comes to drawing with accuracy.