Wednesday, 29 September 2021

How Our Eyes See: Part 2

If you have not read "How Our Eyes See: Part 1" please click HERE first.

Now that we have some practical insight into how our eyes function, the next step is to incorporate that understanding into our work using what we have learned about Integrated Observation. 

The Focal Point
The Focal Point of a drawing or painting is the targeted area where we want to direct our viewer to go. It is usually the main subject or area of the artwork. Selecting this point is based on how our central acuity works, that small 5° area of our vision where everything comes into focus. Understanding Integrated Observation, helps us to select and plan for what the Focal Point of our drawing or painting will be. Here the values will have more contrast, the colours be more intense, and the edges the sharpest. As our subject moves into our peripheral vision, those areas are rendered with less value contrast, less intense colours, softer edges, and less detail. Resulting in a picture that has an overall visual harmony where everything works together as an "integrated" whole in the same way that our eyes see.

Segmented Observation  
Segmented Observation is what I refer to as the natural tendency to quickly shift focus around our environment, in a partitioned way. We are not even aware of it because it is so natural. It is like when we walk down a street. Our eyes are continually moving, shifting focus from people to cars to buildings, then back again. We are looking at "segments" of the street scene using our central vision, causing us to think that everything is in focus. This spills over into how we view any subject when drawing or painting, whether from life or a photographic reference. Unfortunately, we see it with Segmented Observation.

Segmented Observation Into Integrated Observation
Look below at the coins from Part 1. Everything appears to be in focus. Look again, now be aware of how your eyes naturally move from one coin to the next refocusing in order to create that illusion. This is Segmented Observation.

Now, concentrate on the coin with the hole. It is a different visual experience. Only that coin is clear and distinct while the rest become more indistinct. This is Integrated Observation. This area, that you are concentrating on, is the Focal Point.

Creating Integrated Observation From Segmented Observation  
Below I have simulated Integrated Observation to the same coins by applying the concepts discussed here and in Part 1. Note how this treatment directs you to one specific coin, the one with the hole. I achieved this by keeping sharp edges and stronger value contrasts at that spot. Moving out from the Focal Point, we see the edges getting softer, the colours looking slightly less intense, and the value contrasts becoming less with the remaining coins. This is the type of manipulation we want to consciously, create in our drawings or paintings.

Image by Uwe Baumann from Pixabay

Whether consciously or unconsciously, people respond to drawings and paintings that portray their subjects in the same way that our eyes see them. Bringing this understanding into your drawings and paintings will help move your work to the next level.

Continue to hone and develop this important foundational skill in both your daily observations and your drawings and paintings. 

Monday, 27 September 2021

How Our Eyes See: Part 1

Many times I tell my students "It is not about how to draw, but how to understand what you see." It is critical to know how our brain processes and evaluates everything we observe. The brain has a lot of power, especially in the area of sight. When we are born, our eyes naturally see everything upside down. Over time our brain is able to flip that so we can process things right side up. Yet your physical eyes are still seeing upside down, even as you read this!

How the Camera Sees
Contrary to popular belief, eyes do not function in the same way as the camera lens. They are much, much more complex than that. The camera lens sees everything in focus from left to right and top to bottom. The photographic images we see in magazines, books, movies, videos, television, computers, digital phones, and tablets have been taken through a lens of some manufacture. Cameras do create other distortions, but we will save those for another time. Photography has become the ruler that most people use to measure realism. 

How Our Eyes See
Our eyes are quite different from a camera lens. They have both central and peripheral vision or acuity. Our central vision observes what we are looking at directly with clarity, focus, and contrast within a small area of about 5°. Moving out from our central vision, our peripheral acuity covers the remaining 175° or so, seeing larger shapes, movement, and general colours but observes no detail or strong contrasts. 

Integrated Observation

What I term "Integrated Observation" is, in essence, seeing the forest AND the trees in their proper visual relationship in terms of how our eyes see. It is being conscious of how our central, and peripheral vision works together to understand the subject in front of us. Seeing the overall picture as it were. The task at hand is then to translate that understanding to create a visually comprehensive drawing or painting.


A Practical Exercise
Look at the photo of the coins below. Due to the camera lens, this whole image is in focus, from left to right and top to bottom. Now concentrate on the coin with the hole in it. Keep your eyes fixed on that point and observe what happens to the rest of the coins. Even though they are close in proximity, you cannot read the text or clearly make out the images on the surrounding coins. Shift your focus to another coin, now this one becomes clear and distinct but the clarity you had on the first coin is lost. This is how our eyes see. This is Integrated Observation. 

Image by Uwe Baumann from Pixabay
Seeing The World Through Integrated Observation
Now, observe this effect in the third dimension. Place eight or ten coins on a table, and walk through the above exercise again. Repeat this with everything around you, everywhere you go. Remember to stay focused on a single point of whatever it is you are observing. Look at a bookshelf, a street scene, a landscape, the dishes in the sink, people in a group, etc. Take note of your experiences and think about how this could influence your work. 

In Part 2, we will expand on what we have learned here and look at how to apply this practically to our drawings and paintings.   


Friday, 24 September 2021

Pay Attention To The Signs

Squinting your eyes is a beneficial way to observe your subject matter. It helps to simplify its main elements while eliminating unnecessary details. It enables you to concentrate on what is important, especially in the early stages of blocking in a drawing or painting. Larger shapes can be broken down more easily. Even in the later stages, squinting helps to keep you focused on what is important for your work.  

Methods of Squinting
While viewing your subject, close one eye, leaving your other eye open to squint down with. Some find it easier to squint using both eyes. The advantage of one eye being completely closed is that your binocular vision is shut down. This has the effect of flattening out the scene before you. When using the one eye method always close the same eye, don't switch back and forth. Please note that squinting in this way is something to be done at regular intervals throughout the drawing or painting process, not constantly. 

Visual Simplification
Squinting helps simplify the values, colours, and forms of what you are observing, enabling you to focus on the overall appearance of your subject without being distracted by the details and translate that information more accurately into your drawing or painting.

Squinting in Practise
Below, the left-hand image of the heron is slightly blurred to simulate the effects of squinting. Note how the feather and foliage details have now "disappeared" leaving only the larger shapes and values for you to work with. Squint at the right-hand image of the heron to see how your eye simplifies visual information. There is a difference between your eye and a camera.

Practice the art of squinting daily. Do it as you observe people, objects, and scenes, so it becomes more and more natural when you are drawing or painting.

Squinting has been used for centuries by artists to aid them in more accurate drawing and, it is a great technique to add to your sketching skill set. 

Wednesday, 22 September 2021

Art Materials on a Budget

Every artist knows that supplies and materials can be expensive. However, there are alternatives for helping to keep some of those costs down. One is keeping an eye out for sales. Another great resource to consider is thrift stores. While they will never replace your local art store in terms of selection and availability, they can help fill in some holes or downright surprise you with a big-ticket item for next to nothing. This ongoing series will highlight some of the treasures to be on the lookout for when visiting your local thrift store.

Art Storage and Presentation
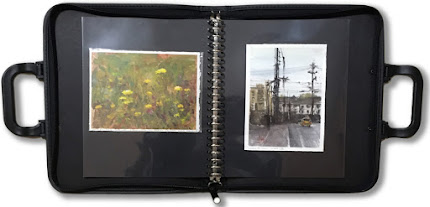
Portfolios are a great way to manage your drawings and paintings. There are basically two types. Both vary in price, depending on size and style, from $20.00 to $200.00 or even more when store bought. The first is essentially a large zippered "file folder" with handles that you place your work into for storage or protected transport. The second type has a set of binder rings added so that it can hold insert pages into which your artwork can be placed and viewed as a book. These are called presentation portfolios.  
Two portfolios I recently acquired are of the presentation type. One is an 8.5" X 11" size book, that came without the insert pages, costing a mere .50¢. The second, 11" X 17" in size, came with ten unused insert pages for only $1.50. To all appearances, they looked new. The 11" X 17" still had some original tags attached. Both were found in the stationary section, alongside piles of three-ring school binders, even though this thrift store has an area dedicated to art materials and supplies. Over the years I have picked up six or seven portfolios of varying sizes and types all for under $20.00! 

Be on the look out next time you are in a local thrift store. Remember, on top of getting a good deal you are usually helping a great cause.

The lesson here is to look for items in unexpected places. Get familiar with where a particular store places those items, then keep a lookout when you visit.

Monday, 20 September 2021

Building a Visual Memory File: Height and Width

If you have not done the lessons in “It's as Easy as A, B, and C" click HERE or "A, B and C: Good Things Come In Threes" click HERE and work through those first before proceeding with this exercise or to give them a quick review.

In "A, B and C: Good Things Come In Threes" we practiced how you can "force" your mind to build a Visual Memory File, resulting in a more accurate drawing of your subject. Here, you will begin to learn how to consciously, familiarize yourself with a subject's visual information. This begins the process of creating a series of checklists. Each list gets added to your Visual Memory File.  These lists become your guides throughout the various stages of a drawing or painting.

Starting a New Visual Memory File
Staying with the bottle from the previous exercise, we will start to break down the type of information we need. First, look for a measure within the subject. One that can be used as a common ruler against the overall subject. In the left bottle below, the height is established as 3 1/3 times its width. The first piece of information for your Visual Memory File. This translates into a proportion, a long thin rectangular shape (middle bottle). The next piece, for your Visual Memory File. That rectangle can be split in half and then into quarters (right bottle). The third piece of data for your Visual Memory File.  


A good start. However, the reason we build a Visual Memory File is to become as intimately familiar with our subject as we can. Just as in any research endeavour, the more informative data you collect, the better your final assessment will be in the end.

With this in mind, the green bottle cap will be used as the measure here, showing the bottle to be 2 1/4 caps wide by 7 1/3 caps in height. This breakdown gives us new information about the placement of different elements within the bottle. For instance, the short neck of the bottle is one cap measure from the top. The curve around the middle of the bottle sits about four cap lengths down. The bottom section of the bottle lies at six cap lengths down, etc. More data for your Visual Memory File.

Four pieces of information about this bottle have been added to your Visual Memory File. They are now part of your conscious memory, not only giving you cues to build your drawing with accuracy but helping you catch mistakes earlier in the process. 

Proportion snd Recognition 
The recognition of a person or object has more to do with the correct proportions of their larger shapes than anything else. Our mind processes large shapes first when it comes to identification. Details come later in the process. If the width to height proportions are correct, you are more than halfway there towards creating recognition in your drawing. 

The recognition of your subject
has more to do with getting its
correct proportions than its detail.

For example, using the information gathered above regarding the bottle, we know it to be a long thin rectangle in its overall shape. Once we begin blocking out the bottle, we quickly become aware of any drawing problems due to inaccurate proportions, as seen below.

A Strong Begining
Establishing height and width are strong, the first steps for breaking down and understanding any subject. There are a number of other visual cues that can be applied. Different ways of gathering more information for your Visual Memory File. We will be looking at these in the near future.

In the meantime review this method with different objects and scenes. Practice working it in your mind as well as down on paper. See if you can develop other ways of assessing your subject and post them in the comments below.

Knowledge is power. Understanding how to collect and apply that knowledge is the key, especially when it comes to drawing with accuracy.

Friday, 17 September 2021

Repairing Damaged Paintbrush Handles

Over time the lacquer on some paintbrush handles cracks, with entire pieces breaking off, exposing the wood beneath. This condition worsens over time as water, turps, or oils work their way into the unprotected wood of the handle.  

One fix for this is to use an Acrylic Gel Medium. First, remove any loose pieces of lacquer from the brush handle. Smooth down the remaining lacquer edges on the handle using fine-grained sandpaper. Wipe off any remaining grit until the handle is smooth and clean. Then spread the gel medium over the exposed wood and cracked edges with a soft-haired brush. Continue brushing the gel around the full circumference of the damaged section of the handle. Doing this helps to create a stronger seal.

Below the gel medium has been freshly applied to the handle of the brush. 

Once the medium dries to a clear finish, the paintbrush is ready to use with the exposed wood sealed up to help extend the life of the brush and prevent further damage to the handle. 

This method also works for sealing the ends of brush handles that you want to shorten. Once the handle is cut down to the desired length, smooth the end with sandpaper to round off the edges. Cover the exposed tip with the gel medium, continue covering about one inch up the brush handle to create a strong seal.

The earlier you can repair this type of damage, the better your chances of extending the life of your brush.

On Location: Mini Sketch Gear

There are numerous ways to transport your sketching materials when working outside of the studio. People employ a large variety of options for storing their materials while sketching on location. Several factors, based on personal preference and materials used, go into the development of a succesful working solution.

My Kit
This is my smallest sketch kit. It is very light and can go anywhere. It easily fits in a jacket pocket, on my belt, or in a messenger bag. I like organization and things staying in place. My solution was to contain everything in a zippered pouch with various sized loops for pens and pencils plus several insert pockets. All of which could be held comfortably in my non-drawing hand. Contained in this kit are three water brushes, two mechanical pencils, an eraser, a fountain pen, a fine-line marker, and a mini watercolour palette. A 5.5" X 3.75" handmade sketchbook using 90 lb Fabriano Artistico watercolour paper finishes up the package. The pouch itself is a military-style one that I picked up at a thrift store. Different types of pouches were tried before finally settling on this one.

One Size Does Not Fit All
It is important to note at this point that this is not the only size I work with. I have larger kits that I also use. It depends on you, how you work, and your specific needs.

Putting Together Your Own Kit
First, sort out the sketching materials you usually work with. Pare them down to what you actually work with. This is probably the hardest part of the process, we all want to bring every color, every sized brush, every pencil and pen, plus the studio sink with us. 

From there, decide how you would like to store those materials taking into consideration how you will access them as you work on location. Some people prefer a simple zippered pouch, like a pencil case, in which everything is thrown into and accessed as needed. Others, who carry a purse, bag, or pack of some sort partition off a section of that. A few forgo a pouch or bag all together putting their sketchbook in one jacket pocket and their other tools in another. 

Once you settle on a direction, test it out at home first. Get familiar with where your materials are kept and how you will access them as you sketch. In this way, when you're on location, everything will be second nature leaving you to focus on the matter at hand. 

An important thing to make a decision about is whether you will be standing or sitting to sketch. Or both. When sitting, you usually have a place to put down your materials, bags, etc. Standing, however, usually requires you to have your materials on your person in some manner, so your hands are free to sketch.

Ready to Go
The best thing about putting a kit like this together is that it gives me no excuses, or regrets, about not being able to do a sketch, whether waiting for a bus, out for a walk, or coming across something unique that I "just have to sketch". 

The Scouts tell us to "Always Be Prepared!" The same can be said for sketching on location. The best way to be prepared is to have your gear always at hand.

Wednesday, 15 September 2021

A, B and C: Good Things Come In Threes

If you have not read “It's as Easy as A, B, and C" please click HERE and do that exercise first as it lays important groundwork for this one. 


Drawing is not so much about the eye or the hand per se. It is more about how your mind processes and understands what is being observed through the lens of the eyes giving your hand the ability to draw a subject more accurately. This exercise is going to “force” your mind to process what it is looking at which will enable you to draw with more accuracy.


Art Materials:

Three pieces of paper and pen or marker (no pencil), a 500 ml/16 oz) water bottle, some form of timer (watch, phone, cooking timer, etc.)  

Set-Up: 

Place the water bottle* about two feet (60 cm) away from you and your drawing materials. Please note that the distance here is important. You will be doing three timed drawings of 5 minutes each. Using a timer helps you to focus on the drawing and not the time. 

* If you prefer a more challenging object, feel free to select something else. However, keep it in the same general size as the water bottle.


Exercises:

1. Start your timer, set for 5 minutes. On the first piece of paper, draw the water bottle, ignore any text, logos, etc. Just focus on the shapes and relationships of the bottle. Do not worry about being perfect. When the timer goes off, stop drawing, even if you have not completely finished. Write the letter "A” somewhere on the page.


2. Look at this first drawing comparing it to the bottle. Note any elements that are out of proportion or out of relationship. For example, the cap is too big or too small, the bottle is too wide or too thin, etc. Keeping this information in mind, turn drawing "A" face down until the end of the exercise. 


3. Reset Your timer. Draw the water bottle a second time and label it drawing “B”. Repeat the assessment process you did in step 2 with drawing "B". Turn it face down.


4. Draw the water bottle for the third time as before. Label this "C”. Review it as above.


5. Now turn over all three drawings. You should see a progressive improvement from “A” to "B" to “C”. Not just in terms of accuracy, but also in terms of feeling more confident with each successive drawing. The lines in your final drawing might seem more assertive, less hesitant. The last drawing of the three is usually the best.


What Happened?

You did not suddenly acquire “talent” over the 15-minute span you were sketching in. As you drew, then redrew, the bottle, your mind became more and more familiar with the subject. The bottle’s height to width ratio, the cap's size compared to the rest of the bottle, where the neck of the bottle turned out, etc. The shapes and relationships began to be more consciously understood, or "seen" in your mind.  


Visual Memory Files

Accurate drawing is about understanding as much information regarding your subject as you can before putting a mark down on your paper. It is building what I call a Visual Memory File. The more information you learn about your subject, the more data you put into your Visual Memory File, the more accurate your drawing will be. We will look at ways to plan and develop Visual Memory Files in upcoming posts.


Drawing is about understanding
as much information regarding your
subject as you can before putting
a mark down on your paper. 


One Strike and You're Out?

Ironically, many people will try drawing something once, but seeing that it doesn’t look right, they give up. If they had continued doing another drawing or two they would have seen much improvement. Without realizing it, their mind had started the process of building a Visual Memory File.


Only for Beginners?

Many professional artists and illustrators have learned the benefit of drawing or painting their subjects numerous times. They practice this with both old and new subject matter. It is invaluable in the planning and preparation for a final drawing or painting. 


Now that you have worked through this exercise, repeat it using other objects always trying to work from life as much as you can.


Dry Brush with a Waterbrush?

Waterbrushes are wonderfully convenient tools for sketching with, especially on location. These brushes contain a reservoir of water in their handles which flows down into their nylon-bristled tips. This eliminates the need for an open container of water, which I always seem to knock over or never find a place to put it down. Their strength, however, constantly flowing water, can be a hindrance if you need to employ any dry brush techniques. The answer is simple. Unscrew the water-filled reservoir and paint with just the tip or attach an empty handle. When you are finished dry brushing, reattach the water-filled handle, squeeze the shaft to clean out the colour from the bristles, and continue sketching.

Monday, 13 September 2021

It's As Easy As A, B, and C

What I want to show you here, and in other posts, is that if you can read and write, you already have the skill set required to drawNow! Today! 

Drawing is not about talent. It is about following the steps required to develop and create a skillset. In other words, a process that is more about "how to understand what you see" rather than simply a formula for "how to draw"

Let's Get Started.
Take out a sketchbook or piece of paper along with a marker or pen (no pencil at this point). Draw the image you see below:

If you were able to draw this shape, you have just proven that you actually can draw and, more than that, you understand some of the basic processes involved with drawing. 

How can I make such an outrageous statement? 

Process: Let's Walk Through It
Most people draw the large, triangular shape of the “A” first, finishing with the small horizontal line. I have never met anyone who drew the cross stroke first. This is the process of drawing in a nutshell: start with the largest shape in your subject or scene, finish with the smaller shapes and details. In this case, the triangular form is the largest shape in your subject. It gives the relational proportions of the height and width while the small horizontal line is the identifying detail giving recognition to the letterform. 

Having a process gives you a plan for where to start and the steps to get you to finish. The biggest frustration for many people is that they look at a blank piece of paper and do not know where to begin their drawing or how to take it to finish. Understanding the process of large shapes to small shapes is an important piece of the drawing process that will help you move forward more easily in your work.

Start with the largest shape
in your subject or scene, finish with
the smaller shapes and details.

Process: Remember Your First "A"
Think back to the first time you tried to draw the letter "A". Did you get it perfect the first time? No, of course not. There was a process given to you by your parent or kindergarten teacher. Once this process of where to start and the steps to finish are understood, it gives you a manageable target for success. Practicing and applying that process brought you to the point today where you can draw an "A" without hesitation or a second thought. 

This learning process of printing individual letters expanded to encompass words, sentences and then moved into grammar and more. It started you on a journey of development that could take you from kindergarten to college or university. The same is true of drawing. Once you understand the processes, you can keep building and developing your drawing abilities

Always remember the two lessons of the "A". First any artistic endeavour requires a process where you understand how to start and the steps that will get you to finish. Second, it takes time to develop and practice those skills.


Welcome to My Blog

The Common Sketcher is a place that enables you to discover your potential in drawing and painting. It is for those who have never tried before but always wanted to. It is for those who are frustrated when they have tried. It is for those who are looking to strengthen and improve their skills. It is for those who are seeking to grow and explore new areas. I include myself in the last category because, as Albert Einstein stated, "The more I learn, the more I realize I don't know." The truth is, I can still find myself in any of these categories at different times because, in the end, we are all students.

My name is Glenn Tait. Over the course of my thirty-plus years working as a graphic designer, illustrator, art director, and workshop instructor I observed that anyone who can read and write already has the skill set to draw and paint. Hundreds of workshop students have proved this to me time and again.

I named this blog "The Common Sketcher" for several reasons. "Common" because I believe that drawing should be as common an act as reading and writing, and "Sketcher" because people are less intimidated by the process of sketching. A sketchbook is a safe place to explore, discover and learn things. With sketching, there is not an expectation to create a "masterpiece" nor a concern to be "perfect". This type of freedom makes it easier to learn, to leave something unfinished, or to turn the page and start anew. 

The content in my posts will encompass targeted instruction, tips or hacks about various materials and methods, information on artists, and more. These posts are process-oriented in structure, meaning that they are written to be practical and applicable to all learning levels. So whether you are a beginner or a more seasoned professional, you will find something along the way to benefit you in your work. 

Articles will be posted most Tuesdays and Thursdays. I am looking forward to your questions and comments in the days and months ahead.